Thursday, December 15, 2011

A Look at the layers

Here is a look at the environment with the basic diffuse texture applied, with no lighting.


 This layer shows the shapes in the scene with lighting information.


This layer shows the shapes in the scene with normal and specular maps picking up the lighting information.


The finished product is a combination of all of the layers.

The Propulation!

It took a while, but they are all now in UDK! I fell into some difficulty with textures not going in the right place which set me back 40 minutes but it was resolved. Now its time to arrange them all beautifully in the scene.


Now the fun begins...

Time to Propulate!!!

I have created a number of basic props to Propulate (populate with props) my environment.
 Plywood boards, wooden pallets and wooden planks.
 Cardboard boxes open and closed, also broken boxes to scatter about the floor.
 Sheets to cover storage units and crates. Also sheets that are clumped on the floor.
 Crates of all different sizes to represent storage.
Metal shelf units, metal beams and sheets and a bin.

At this point I am exporting these objects into UDK ready to populate my environment.


Tuesday, December 13, 2011

Environment in UDK

Now I have both the Galloper and building in UDK i can move onto the other props in the scene. I have also lowered the brightness on the specular maps to remove that glossy look.

Lighting test in Maya


I decided to put the Galloper in the scene and play around with some lighting in Maya . I used a blue point light and a white spot light that used depth map shadows. Just a small exercise to visualise if this combination of lighting will set the right mood. Personally i feel the blue point light makes the environment feel cold and the white spot light casts menicing shadow on the wall. I will play around with both of these in UDK where the scene can be lit to a higher quality.

Bulilding structure done!

The building is now complete with the support beams in place. It is now ready to be imported into UDK.

At this point I created some doors and other objects to be placed around the walls of the building to make it more believable as a location.

These three props are used to flesh out the scene, a large door, normal door and wooden board are placed about the environment, this helps with the aesthetic quality of the level along with breaking up the wall textures to hide the repetition.


Monday, December 12, 2011

Building under construction

I am now building the warehouse for the galloper to go inside. I wanted the building to look old and similar to the environment concept I created. I used the colour palette from that concept to paint my textures.

I have yet to create the roof and support structures but will hopefully have them done by the end of today and all exported into UDK.

This is the overall layout of the warehouse. I added archways and pillars to break up the repetition in the textures, this also made the scene more interesting.

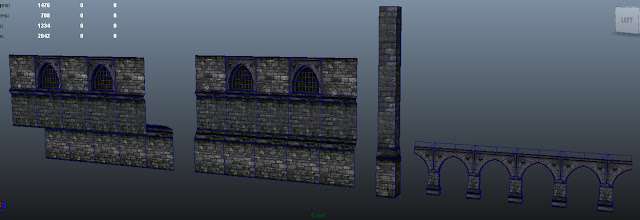
These four sections make up the walls of the warehouse, originally i was going to add them into UDK separately and assemble the environment in the editor. Due to time constraints i am now going to assemble the scene in Maya and export it all as one object. boom